Saturday, July 30, 2011

Chocolate and cherries, oh my!

While this blog is focused on pie, I really do love cake also.  Sometimes I think about how to turn a particular cake into a pie.  Black Forest cake is basically chocolate cake with cherry filling, so that translates into a pie very naturally.  Chocolate pudding with a cherry topping...nothing about that sounds bad!!  This is a no-bake pie, which I like even better considering how hot its been in Denver.  I saved myself the step of even turning on the oven to make a crust and just bought a pre-made chocolate crust at work.  We carry a brand called Wholly Wholesome.  This was my first time using this product and I really liked it. The crust tasted great and is made without preservatives, artificial flavors and other nasty ingredients, BONUS!  The cherries in Black Forest cake are typically flavored with kirsch, which is cherry liqueur.  I didn't want to buy a whole bottle of that when I have perfectly good booze at home, so I went with rum and Grand Marnier (orange liqueur) which complimented the cherries perfectly.

This Black Forest Pie is rich and decadent, but pretty easy to throw together, so there's nothing stopping you from getting this delicious gem into your pie-hole.  Not even the oppressive heat outside.  Get going, you could be eating chocolate and cherries, for goodness sake!

Black Forest Pie
1 9" chocolate pie crust

Topping
3 cups pitted cherries
1/2 cup sugar
1/2 cup water
3 Tb. cornstarch
pinch of salt
1 Tb. Grand Marnier
1 Tb. dark rum

Filling
2 cups half and half
2 Tb.cornstarch
1/2 cup sugar
pinch of salt
2 eggs
1 Tb. butter
4 oz. bittersweet chocolate, chopped


1 1/2 cups heavy cream
2 Tb.  powdered sugar
1/2 tsp. vanilla extract

fresh cherries to garnish, if desired

In a pot over medium high heat, combine the cherries, water, sugar, cornstarch and salt, stirring to dissolve the cornstarch.  Bring the mixture to a boil and then turn down the heat to low and simmer for about 10 minutes, until the cherries are softened and the mixture is thick.  Add the alcohol and simmer just a few minutes more.   The mixture should be very thick and shiny.  Scrape it into a bowl and allow to cool in the refrigerator.

For the filling, bring 1 1/2 cups half and half, sugar and salt to a simmer in a pot.  While you're waiting for the mixture to heat, whisk together the remaining 1/2 cup half and half, the eggs and cornstarch in a bowl.  Add the hot half and half slowly, whisking constantly.  Pour all of the mixture back into the pot and bring to a boil over medium high heat, whisking constantly until the pudding has thickened.  Remove from the heat and add the chocolate and butter.   Whisk until both have melted and the mixture is smooth.  Pour into the pie crust and press plastic wrap directly onto the surface of the pudding.  This will prevent a skin from forming.  Place in the refrigerator and allow to cool about 6 hours, or overnight if you like.

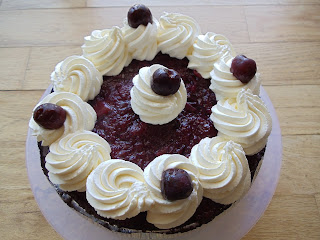
Once the pie and cherry topping have completely cooled, make the whipped cream.  Beat the heavy cream, sugar and vanilla together with an electric mixer until stiff peaks are formed.  Remove the plastic wrap from the pie filling spread the cherry mixture over the top -- it will be a generous amount!  Use the whipped cream to decorate the top as you like.  I piped big swirls and garnished with fresh cherries.  Delicious decadence!

Saved myself the time and heat with this tasty crust.
Whisking the chocolate and butter into the pudding mixture.
Pour the filling into the crust and press plastic wrap on top.
When cooled, add the cherry topping.
Decorate with whipped cream and cherries.  Delicious!
Close up goodness!

Wednesday, July 20, 2011

Blueberry grudges

Let me start by saying that as a general rule, I think that whipped cream improves everything.   OK, maybe not sushi, but you know what I mean.  I kind of have a grudge against blueberries.  When I was running my business I spent countless hours baking delicious muffins but all anyone ever wanted was blueberry.  White chocolate strawberry?? No, thanks!  Apple streusel??  Meh.  I swear, I could have offered solid gold muffins for $2 but people would have still turned up their nose and asked, "Don't you have any blueberry?"  So I became bitter towards the blueberries, whom I wasn't all that crazy about to start with.  Now that I've had some distance from  my blueberry muffin days, I look at the little berry fondly again, and without giving them the stink-eye.  While they are still my least favorite of the berries, I think blueberries, like mostly anything, are vastly improved with whipped cream.  And ice cream.  So here is a blueberry pie topped with whipped cream.  Blueberries are very good for you, so it's OK to splurge on the cream.  Because life is all about balance.  And letting go of grudges.

Blueberry Pie (with Whipped Cream)

1 9-inch graham cracker crust

2 pints blueberries (mine were frozen)
juice and zest of one lemon
sugar to taste, I used 1/2 cup
4 Tb. instant Clearjel (or about 2 Tb. cornstarch)
1/2 cup water

2 cups heavy whipping cream
3 Tb. powdered sugar
1/2 tsp. vanilla extract

If you are using instant Clearjel, combine it with the sugar first, and then add to all the other ingredients in a small sauce pot.  Bring the mixture to a boil over medium-high heat, and then reduce to low and  simmer for about 10 minutes, stirring often.  Pour the filling into the graham cracker crust, smooth the top and put into the refrigerator for a few hours, until cold.

Whip the cream with the sugar and vanilla until stiff peaks are formed.  Cover the pie with the whipped cream, or use a piping bag and star tip if you want to make it fancy.  Enjoy!


Nothing like a thick ring of whipped cream to making everything better!

Tuesday, July 19, 2011

Life is a Bowl of Cherries!

It just wouldn't be a pie blog without a classic cherry pie!  I've actually never made a cherry pie from scratch.  When I was a kid I made cherry pie using canned filling.  But this was my first attempt using fresh cherries.  And by the way, get yourself a cherry pitter of some sort!  I still don't have one and did this by cutting the cherries open and prying out the pits and it took WAY too long, not to mention my cuticles and nails were stained for two days!  I'll be purchasing one today as I still have about five pounds of cherries to pit.

We've discussed before about the benefits of experimenting in the kitchen because you always learn something.  This time I learned that I prefer a juicier cherry pie and should put less thickener in the filling.  This one sliced nice and clean, but a little extra sauciness surrounding the cherries would have been perfection.  As with mostly everything, you'll need to adjust this filling to your taste and fruit.  Add a little extra sugar if your cherries are pretty tart, or don't, if you like them that way.

A lattice top crust is typically the way that cherry pie is presented.  Making a lattice from scratch is a commitment, so I thought this would be the perfect time to use my pie topper stencil from King Arthur Flour.  I used the heart side, of course!  For this pie I used my good ol' vodka pie crust from Cook's Illustrated and I highly recommend you do as well!  But nobody will know if you use a pre-made crust or your own favorite recipe.

Classic Cherry Pie
Makes one 9-inch pie

1 recipe pie dough for a double-crust pie
4 cups pitted cherries
Sugar as needed, I used 1/2 a cup
2 Tb. lemon juice
1/4 cup orange juice
2 Tb. cornstarch (may need more or less depending on your fruit)
1 tsp. vanilla extract
1/4 tsp. almond extract

Place a sheet pan on the bottom rack of your oven and pre-heat the oven to 400 degrees.  Combine all the filling ingredients and set aside.

Roll out your bottom crust and place into the pie pan, being sure to press it in evenly.  Roll out your top crust.  You can cut it into strips for a lattice if you like, or use a stencil like I did.  Place the filling into the the pie pan and brush the edges of the pie dough with water.  Cover with the top crust and press the edges together, the water will help them stick.  Trim the edges of the crust so they are even with the pan.   Flute them if you want, or just use the tines of a fork to crimp them.  If you aren't using any kind of design on the top, cut a few steam vents.  Place the pie in the freezer for 15 minutes then remove.  If you want, you can brush the pie crust with cream and sprinkle with raw sugar for a nice brown, crunchy finish.  Place the pie on the hot pan in the oven and bake for 25 minutes.  This will help the bottom crust set.  Move the pie and the pan to the middle rack and lower the temperature to 350 degrees.  Cook for an additional 20 to 40 minutes, or until the crust is nicely browned and you can see the cherry filling bubbling.
My adorable heart stencil!
By rolling your crust onto your rolling pin, you can easily transfer it to the pie pan.
My beautiful cherry pie after a short nap in the freezer.  Brushed with cream and sprinkled with raw sugar.  Look at those beautiful flutes on the edge!  Too bad they don't stay so perfect after being in the oven.
The finished pie!  See what I mean about the fluting on the crust?  Oh well, I'll work on it.

Peek-a-boo hearts! I see you cherries!

Wednesday, July 13, 2011

Blueberry pie with the quickness!

Today let's keep it short and sweet!  This pie is easy to throw together, especially if you prep in advance and keep discs of pie crust in the freezer.  Or you can pick up your favorite crust at the grocery store.  The blueberries don't need to be cooked ahead of time, just tossed with a few ingredients and then topped with a crunchy, sweet crumble topping.  This would be lovely served warm with ice cream or whipped cream.


Blueberry Crumble Pie
1 9-inch pie pan

1 pie crust, unbaked
Filling
4 cups blueberries
zest and juice of one lemon
3/4 cup sugar (more or less depending on your taste and berries)
4 Tb. instant Clearjel (or 2 Tb. cornstarch)
pinch of salt
Topping
1 cup flour
1/2 cup rolled oats
1/2 cup brown sugar
1/4 tsp. cinnamon
1 stick butter, melted

Put a sheet pan on the lowest rack of the oven and pre-heat to 400 degrees.  Fit the crust into a pie pan and decorate the edge as desired.  Put into the freezer.

Add the lemon juice, zest, salt and half a cup of sugar to the blueberries.  Toss together and set aside.  Combine the remaining sugar and the instant Clearjel and set aside.

Combine the flour, oats, brown sugar and cinnamon in a small bowl.  Add the melted butter and mix well, until the mixture is crumbly.  Put into the refrigerator for 15 minutes.

Take the unbaked pie crust out of the freezer. Combine the sugar and Clearjel mixture with the berries and toss well to combine.  Put the berries into the pie crust.  Sprinkle the topping onto the top of the pie, breaking up with your fingers to make crumbles.  Place the pie onto the pre-heated sheet pan and bake for 30 minutes.   Then lower the oven temperature to 350 and move the pan to the center rack.  Bake for another 20 to 30 minutes, until the crust and topping is nicely browned and you can see blueberry juices bubbling through the cracks.

Tuesday, July 12, 2011

Tartin' it up with Cherries!

Cherry season is upon us and I decided to take advantage of the sale on bing cherries at work.  So I bought eight pounds. Maybe a bit excessive, but I can make all kinds of cherry goodies and if I can't get to it right away, the cherries can join their friends the blueberries in the freezer!

For my first cherry project I went with this cherry almond tart, which utilizes the same tart dough I used in my summer fruit crostata.  I still had a chunk in the freezer (it helps to plan ahead and make extra!) so it was a snap to defrost it in the refrigerator over night and roll it out when I was ready to bake.  I couldn't ask for a better dough to pair with the sweet almond filling and juicy cherries.  But if you're looking to streamline the process, try using puff pastry from the frozen section at the grocery store.

I've never made this exact recipe before, and like pretty much all of the cooking and baking I do, I experiment a lot and make changes to recipes to suit my own tastes.  When I was a pastry chef on a train, I used to make a pear tart using almond paste, which is one of my most favorite ingredients.  But since it's Summer, I liked the idea of using cherries with the almond filling, so I went for it.  I know a lot of people at home are not comfortable with "winging it" but I really encourage you to do this.  It will build your cooking skills and your confidence and makes for great experience because you always learn something.  Like today, I learned that when baking this tart, the almond filling puffed up and and engulfed the cherries, almost totally hiding them.  But I didn't panic, I just put some more cherries on top and finished baking the tart.  So I'm passing that knowledge on to you and writing the recipe so that the cherries are added when the filling is partially set, that way you can still see the pretty red lumps peeking out of the sweet almond filling.  See,  experimenting in the kitchen is fun!

Cherry Almond Tart
I used an 11-inch tart pan with a removable bottom

Crust
Use the crust of your choice, I like the Sweet Pastry Crust from the Joy of Baking website

Filling
1 7-ounce tube almond paste
4 Tb. unsalted butter, softened
3 Tb. flour
2 Tb.sugar
3 eggs
pinch of salt
1 1/2 cups pitted cherries (approximate)

Place an empty sheet pan on the bottom rack of the oven and pre-heat to 400 degrees.  Roll out your crust of choice and press into the tart pan. Use a fork to prick holes all over the crust to keep it from bubbling up and shrinking.  Place the pan into the freezer for about 15 minutes, or until solid.  Remove the pan from the freezer and line with a piece of parchment paper or foil.  Fill the pan with beans or pie weights and bake on the hot pan for 20 minutes until the crust is partially set.  Remove the paper and beans and set aside to cool while you prepare the filling.  Turn the oven down to 350 degrees.

In a mixer bowl, combine the sugar, salt, flour, almond paste and butter.  Mix on medium speed until the mixture comes together and forms a ball.  Add the eggs and beat well until there are no big lumps.  Almond paste has a grainy texture, so it won't be perfectly smooth.

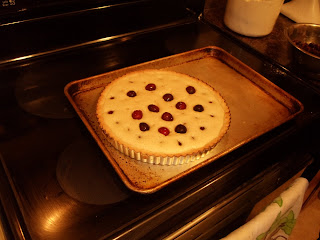
Pour the filling into the crust and smooth the top.  Place back on the pan and cook for 20 minutes, until the filling is lightly puffed and starting to set.  Remove the pan from the oven and gently press the cherries onto the filling.  You can scatter them around or make a pattern, your choice.  Use as many cherries as you like.  Put the pan back into the oven onto the top rack, and allow to cook for approximately 15 minutes more, until the filling is golden brown.  Place the tart on a rack and allow to cool for at least 20 minutes before you dive in.  This tart slices best when it is completely cooled, but my friend Leslie and I couldn't wait long enough and attacked it while it was still warm.  It is also delicious cold or at room temperature.  Just eat it, trust me.


Line the pan with the crust, dock with a fork and freeze until firm.
Blind bake the crust for 20 minutes at 400 degrees.

Mix the almond paste, flour, sugar and butter.

Add the eggs and beat until it looks like this.
I added the cherries first, like this.
But the cherries disappeared!  Quick, throw some more on there!

All's well that ends well!
I love happy endings.  And this tart.


Saturday, July 9, 2011

Key Lime

Key lime pie is the quintessential summer pie, if you ask me.  Not that I wouldn't enjoy it year round, of course!  But something about that tart, sunny flavor just says summer.  Plus, it's so easy to make, there's no excuse not to!

If you can find fresh key limes, that is really the best way to go.  But those suckers are tiny and don't have a lot of juice, so be prepared to buy about 30 to 40 limes and to spend some time squeezing!  The work can be made much easier with a hand held citrus squeezer because you can pop in a few lime halves at a time.  If you must use a bottled juice, I highly recommend Nellie & Joe's Famous Key Lime Juice.  I've found this at Safeway before.

I made this pie using a vanilla wafer crust just to mix things up a bit, but I usually use a graham cracker crust.  The pie filling is the same as my lemon pie and is a cinch to whip up.  Go make it now!  Go!  I mean it!

Key Lime Pie
I used a 9-inch deep dish pie pan

Crust
2 cups vanilla wafer crumbs (or substitute graham)
1 cup butter, melted

Filling
2 cans sweetened condensed milk
4 eggs
1 cup key lime juice
1 Tb. key lime zest
pinch of salt

Combine the cookie crumbs and melted butter in a bowl until well mixed.  Press the crumbs firmly into the pie pan.  Bake at 350 degrees for 10 minutes.  Set aside to cool.

For the filling, whisk all the ingredients together in a bowl until smooth.  Scrape the filling into the prepared crust.  Bake in a 350 degree oven for approximately 20 to 30 minutes until the filling is set and jiggles slightly when you shake the pan gently.  Cool on the counter for about 15 minutes and then transfer to the refrigerator and cool at least 6 hours or overnight.  Decorate with whipped cream and lime slices, if desired.

Key limes ready for squeezing.  A lot of squeezing.
The finished key lime pie.
A delicious slice of summer!

Friday, July 1, 2011

G'day, Aussie Meat Pies!

I've been hearing more and more about Australian meat pies in recent times.  From what I gather, they have quite a following in the U.S., and meat pie shops are popping up across the country.  I've never had one before, but I figure what's not to like about beef and gravy in a pie?  I love all pies, sweet and savory, so I knew I had to make some Aussie pies for the blog.

I did a lot of internet research on Aussie pies.   The basic idea is always the same, but recipes varied when it came to the crust.  Many called for a basic pie crust, some called for puff pastry.  A few recipes, including some from actual Australians, called for using a regular pie crust on the bottom and puff pastry on the top.  I decided to go with a regular "short crust" pie pastry, as that seemed to be most authentic.   However, I strayed slightly by using a rich short crust recipe, which adds eggs to the dough.  This would give the pie crust a little more structure, in addition to a nice texture and richness from the eggs.  I used my own variation of the crust recipe from Giada De Laurentiis' (the big-boobed, bobble-headed, over-enunciating host on Food Network) Pizza Rustica, which I had made in the past and knew that I like the taste of the crust, as well as its ease of preparation.  However, after making the Cook's Illustrated pie crust with vodka with such outstanding results, I knew I had to get some vodka  in there!  I also changed the recipe from part butter and part shortening, to ALL shortening, because I really do believe it makes a superior crust because Crisco doesn't contain water like butter does.  It also doesn't have as much flavor as butter, which is why so many recipes use all or part butter, but I figure when the filling is flavorful and beefy, who cares.

To bake the pies I used my newly purchased mini pie pans, available from King Arthur Flour. These are 6-inch pans and make pretty big meat pies.  Possibly a little too big, depending on your appetite.  If you don't have mini pans, you can bake one big pie and cut it into slices.   Or you can cut circles, put the filling in the middle and fold them into half-moon shapes, but be sure to seal the edges shut with water and press together with the tines of a fork.

Australian Meat Pies
Makes two, 6" pies

Pastry Crust
This recipe makes enough for a double recipe of filling (4 pies total), possibly with enough left over for a few small half-moon shaped pies.  Because I always like to plan ahead and make life easier for myself, I made the full recipe then divided the dough in half (to make 2 pies) and put part in the freezer for another use.

3 1/2 cups all-purpose flour
1 Tb. sugar
1 tsp. salt
1 cup shortening, frozen and then cut into small pieces
3 eggs, beaten
1 Tb. ice cold vodka
3 to 4 Tb. ice cold water

Blend the flour, sugar, salt and shortening in a food processor until the mixture looks like a coarse meal.  Add the eggs and blend briefly.  With the machine running, add the vodka and water (start with 2 Tb. water) and mix until the dough just starts to come together, adding more water a tablespoon at a time as needed.  Empty the dough out onto a lightly floured surface and divide into two pieces.  Flatten them out and wrap with plastic wrap.  I put one disc into the freezer for later, and the other into the refrigerator to rest for at least 30 minutes, or overnight if you like.  Because I used all shortening in this recipe, the dough does not get rock-solid and is very easy to roll out straight from the refrigerator.

Filling
1 lb.  ground beef
1 small onion, minced
3 Tb. flour
1 tsp. dried thyme
1 tsp. dried oregano
1 tsp. garlic salt
pinch of ground nutmeg
2 Tb. ketchup
2 Tb. soy sauce
2 Tb. worcestershire sauce
1 cup water
salt and pepper to taste
Milk, about a tablespoon for brushing the top crust

Put the ground beef and onions into a saute pan over medium-high heat.   Break apart with a wooden spoon and cook until the meat is no longer pink.  If there is a lot of excess fat, drain off all but about 2 tablespoons.   Add the flour, thyme, oregano, garlic salt, nutmeg and ketchup, still until well combined and cook for about 2 mintues.  Add the water, soy sauce and worcestershire, stir well and reduce the heat to medium.  Cook for about 10 minutes, until the gravy is reduced and the mixture is very thick.  Season with salt and pepper to taste.  Set aside to cool to room temperature.

Pre-heat the oven to 400 degrees and place a sheet pan on the rack, which should be positioned  at the bottom of the oven.  Heating the pan will help the bottom of the crust to cook properly.

Meanwhile, on a lightly floured surface, roll out your disc of dough to about 1/4 of an inch thick, 15-inch circle.  Invert the mini pie pans onto the dough and cut out two circles following the rim of the pans, these will be your pie tops.  Then cut out two circles about 1/2 an inch larger than the pans, these will be your pie bottoms.  (You can re-roll the scraps if you need to, but only do this once or the crust will be tough.)  Press the larger circles into the greased pie pans and divide the cooled filling between the two.  Brush water around the edge of the dough and top with the smaller circles, pressing well to seal.  Use a fork to crimp the edges.  Cut a few steam vents in the top with a sharp knife and brush with milk.  Place the pies on the pre-heated pan and cook for 25 minutes.  Move the entire pan of pies up to the top rack, and cook about another 10 minutes, to help brown the crust.  The pies should be brown and the gravy will be bubbling through the vents and looking quite delicious!  Allow to cool 10 to 15 minutes before digging in, or else you might burn your tongue!  The Australians say that serving these with ketchup is a must, but I'll leave that up to you.

These tasty pies are a perfect stand-alone lunch, or add a salad to make a complete dinner.  Experiment using different fillings if you don't want just beef, chicken and/or vegetables would be delicious too.  And if you really want to save yourself some time, I won't judge you for buying pre-made crust.  Just make them, you'll see what all the fuss is about!

Saute the beef and onions.
Add flour, ketchup, thyme, oregano and nutmeg.  Cook for a few minutes then add the water, soy sauce and worcestershire.
Cook for about 10 minutes until thick.  When you scrape your wooden spoon across the pan, the trail should stay separated like this.
Roll out half of the dough on a floured surface.
Use the pie pan to cut out the two different sized circles.
I re-rolled the scraps to get my last pie bottom.
Press the large circles in to the pans and divide the filling between the two.  Brush the edges with water and add the tops, sealing well.
Place the pies on the pre-heated sheet pan set on the bottom rack of the oven.  Don't skip this step, it makes the bottom crust nice and brown and crisp.
The finished pies!
Get in my belly!
Delicious pie with meaty filling and flaky crust.  You know you want it!
After eating 2/3 of a pie to myself and being thoroughly stuffed, I decided that smaller pie pans are needed for individual servings, or split one pie between two people.  Or just make the half-moon shapes as I described above.  I'll be doing that next time.  And there will be a next time very soon because these really can't be beat!