Wednesday, May 29, 2013

A Fiesta of Tamale Pie!

Tamale pie??  OK, bear with me.  I don't always want to make sweet pies and I got this clever new Chicago Metallic pie bowl pan and I wanted to do something different.  Trust me!  One of my part time jobs is as a chef instructor at Sur La Table in Denver and recently our store manager asked me if I'd make some pies in this new pan so that the store could serve samples.  Turns out I really took a liking to this little pan.  It makes four cute individual pies with a little bowl-shaped indentation baked right in, perfect for filling with a scoop of ice cream.  It even comes with a cutter to stamp out circles for the top and bottom of the pies.  While I was making apple pies for the stores, I got to thinking that it would be great to make savory pies as well.  Think chicken pot pies with gravy in the bowl, or a puff pastry crust filled with beef and gravy and a scoop of mashed potatoes in the bowl (double carbs, heaven!!), or . . . tamale pie with guacamole in the bowl!!

I sold tamales over the holidays and still have some fresh corn masa in the freezer, so naturally I used that for the pies.  If you aren't familiar with masa, it is basically fresh corn that has been soaked and treated with lime and ground into a moist dough.  I was lucky enough to get freshly ground masa on the cheap at a local tortilla factory, but it is also often stocked in large Hispanic markets, especially in December when tamales are traditionally made.  Fresh masa is superior for making homemade tamales and tortillas, you can't beat the wonderful corn flavor and aroma.  You could easily make this recipe using masa harina, which comes dry in a bag, and is more readily available.  You simply mix it with water until you get the right consistency.

I melted cheese on my finished pies and filled the bowls with fresh guacamole.  Add a little pico de gallo and sour cream to garnish and you are in for a delicious treat.  If you decide to pick up one of these pie bowl pans, do yourself and favor and buy two so it won't take so long to fill and bake several batches.  Look for these adorable little devils again on the blog, I have a lot of sweet and savory ideas to try out!

My new favorite kitchen toy!
Tamale Pies
Makes 10

Tamale Dough
2 1/2 pounds fresh corn masa (available at large Hispanic markets or directly from a tortilla factory)
1 tsp. salt
water, as needed

Place the fresh corn masa in the bowl of a stand mixer and add the salt.  Mix on low speed until well combined, about one to two minutes.  If the masa is dry and crumbly add a little water, about a teaspoon at a time, until the dough is firm and holds together.  It should feel a bit like Play-Doh - a solid mass, not too dry, and not sticky but leaves a light residue on your hands.

Divide the masa in half and roll it out between two sheets of plastic wrap to 1/4 inch thick.  The plastic wrap should peel off the dough easily.  Use the red circle template to cut out tops and bottoms in the masa and gently peel them off the plastic, set aside on a sheet tray lined with plastic.  Add the scraps to the second half of the masa and repeat the rolling and cutting process.  Re-roll the masa scraps as many times as you can to cut more tops and bottoms.

Filling
1 1/2 pounds ground beef
2 Tb. chile powder
1 Tb. ground cumin
1 Tb. smoked paprika
1 small onion, chopped
2 large cloves garlic, minced
Salt and pepper to taste
2 Tb. tomato paste
1/2 cup water

In a large skillet over medium high heat, add the ground beef and crumble with a spoon.   When cooked, drain off the excess fat and add the spices, onion and garlic and mix well.  Cook until the onion is starting to soften, about 5 minutes, and then stir in the tomato paste and water.  Put a lid on the skillet and reduce the heat to low.   Cook about 15 to 20 minutes, stirring occasionally and adding a little more water if  the pan is getting too dry.  Spread out the filling on a sheet tray or large dish and let cool.

Pre-heat the oven to 375 degrees.  To assemble to tamale pies, melt 4 tablespoons of butter.  Brush the butter on one side of four of the cut out masa dough bottoms and fit them into the pan, buttered side down.  Be sure the press the dough firmly into place so there are no air bubbles.  Fill each pie with about 1/2 cup of the beef filling.  Take 4 cut out tops of the dough and press them onto each pie.  Press the edges together very well to make sure they are sealed.  Brush the tops with more melted butter.  Bake on a sheet tray in the pre-heated oven until the masa is firm and set, about 20 minutes.  Turn the pies onto a cooling rack.  Repeat the process of filling and baking the pies until the masa dough and beef is used.  Serve hot with cheese, salsa, guacamole and sour cream.

The proper consistency for the fresh masa.

Roll the dough out between plastic wrap and use the enclosed cutter to stamp out the tops and bottoms.
Fit the bottoms into the pan, buttered side down.
Fill with the seasoned ground beef.
Add the tops and press the edges together to make sure the pies are sealed.  Brush the top with butter.

The finished tamale pie, filled with with cheese and guacamole.  I squirted the sour cream out of a piping bag, I'm fancy like that.

Delicioso!!

Wednesday, May 15, 2013

How to Make Pie Better? Fry It!!

Fried pies.  Yes, you read that correctly.  Fried. Pies.  When you were a kid did you eat those Hostess Fried Pies with their naughty, crispy crust and thin coating of sugary icing?  My dad used to buy those for us as a treat once in a while and I loved them!  Especially the ones that were filled with CHOCOLATE PUDDING!!  What could possibly be better than fried dough filled with creamy goodness?

Homemade Fried Pies
I made baked Peach Hand Pies a while back and have always planned to make fried pies. Well I finally got around to it and I'm kicking myself that it took me this long!  I'm a die hard chocolate fan, but my other half is more of a vanilla gal so I made both types of filling.  These delicious devils are pretty rich so you don't need to make them very big.  I used a Wilton Mini Pie Press to make mine and even at only 4" x 2" I still haven't finished the other half of mine.  

I  knew I needed a sturdy crust for these in order to hold up to the frying without bursting or tearing.  So I used a modified version of the rich pie crust I used in the Italian Easter Pie.  This really is a great crust and using all shortening makes it easy to roll out even when it's very well chilled and the eggs add extra structure and moisture.  This especially comes in handy when re-rolling the dough scraps for another round of pies, more fat in the dough will help keep it from getting too tough.  Be sure your filling is very well chilled so that it doesn't leak out when frying the pies, especially the vanilla which is a bit softer than the chocolate anyway.

Go forth and fry pies, my friend.

Pudding Filled Fried Pies
Yield: Depends on the size of your pies, I made 12

Crust
3 1/2 cups flour
1 Tb. sugar
1 tsp. kosher salt
1 cup shortening, frozen and cut into small squares
3 eggs, beaten
2 Tb. ice cold vodka
2 - 4 Tb. ice cold water

In a food processor combine the flour, sugar and salt and pulse briefly to combine.  Scatter the frozen shortening over the flour and pulse briefly until the mixture looks like a crumbly meal.  Combine the eggs, vodka and water and pour through the feed tube while pulsing the processor.  Mix just until the dough starts to come together.  Turn the dough out onto a floured work surface and knead a few times, just to bring it all together.  Divide into two disks, wrap tightly in plastic wrap and put in the fridge for at least 30 minutes or overnight.

Chocolate Filling
Adapted from Rachel Ray's recipe
1 cup half-and-half
4 oz. semi-sweet chocolate, chopped
pinch of salt
1/4 cup sugar
2 Tb. cornstarch
1 Tb. unsalted butter

In a small pot over medium heat, combine the sugar, cornstarch, salt, and half-and-half and whisk well until the cornstarch is dissolved.  Heat the mixture until it boils, whisking constantly.  Remove the pot from the heat and stir in the chocolate and butter.  Let sit a few minutes to let the chocolate melt and then whisk very well.  Pour the filling into a bowl and press a piece of plastic wrap directly on the surface to keep a skin from forming.  Chill completely, about 4 hours or overnight.  You will likely have more filling than you need for this recipe.

Vanilla Filling
1/2 cup sugar
3 Tb. cornstarch
pinch of salt
1 1/2 cups half-and-half
2 egg yolks, beaten
1  Tb. unsalted butter
2 tsp. vanilla extract (I use Nielsen-Massey Vanilla Bean Paste)

In a small pot over medium heat, combine the sugar, cornstarch, salt and half-and-half and whisk well until the cornstarch is dissolved.  Heat the mixture until it boils, whisking constantly.  Add about 1/2 a cup of the hot mixture to the beaten egg yolks, whisking constantly until combined.   Add this mixture back to the rest of the filling in the pot and put back on the heat.  Bring back to a boil, whisking constantly.  Remove from the heat and whisk in the butter and vanilla.  Pour the filling into a bowl and press a piece of plastic wrap directly on the surface to keep a skin from forming.  Chill completely, about 4 hours or overnight.  You will likely have more filling than you need for this recipe.

Icing Glaze

2 cups powdered sugar
2 to 3 Tb. milk

Whisk the sugar and milk together until there are no lumps.  You may need to add a little more milk and/or sugar to get the right consistency.  It should be very thick, but still drip slowly from the whisk.  It needs to be thick enough so that it won't immediately run off the hot pies and coat the pie in a nice even layer.

Heat about 1 inch of vegetable oil over medium-high heat in a heavy skillet or pot to 350 to 355 degrees.  The oil should be hot enough to brown the crust quickly so that the filling doesn't get too hot and explode, but not so hot that the crust browns on the outside before it is fully cooked.  Test the oil with a small scrap of rolled dough, you want it to brown on each side in about 1 to 2 minutes.

Working with one disc of dough at a time, roll it out to 1/4 inch thick.  Cut out your desired shapes (round for half-moon shaped pies, squares, rectangles, whatever you like) and place a small amount of filling in the center of the dough and do not spread it out.  The amount of filling will depend on the size of your pies.  For my 4" x 2" pies I used about 2 heaping tablespoons.  If you are making small 2-3 bite pies you may only need a teaspoon.  Don't overfill them, you don't want them to explode or leak in the hot oil.  That will ruin your day, trust me.  Place another piece of dough on top, or fold over the other side, and press together to seal.  Be sure to seal the dough very well, using a little water or beaten egg around the edges and crimp the dough together with the tines of a fork.  Re-roll your scraps once and cut and fill more pies.  

Fry the pies, a few at a time, in the hot oil, turning several times if needed to brown them evenly.  Drain the fried pies on paper towels, let them cool for about a minute and then brush the icing over one or both sides.  After a little more cooling the glaze will set and dry on the outside.  These pies are delicious warm or cold.  But be sure to keep them in the refrigerator, if they don't get eaten immediately!

Hostess has NOTHING on these fried pies!

Friday, May 10, 2013

The Return to Pie

Aw yeah, a new pie for the blog!!  I'm  feeling pretty proud of myself right now!  After such a LONG hiatus it feels good to be baking and writing again.

It was a dark and stormy day yesterday and I had no intention of leaving the house so I wanted to make a pie using stuff I already had.  Among those items was a container of strawberries that were pretty disappointing in flavor.  However, I also still had a frozen bag of road-side stand strawberries from my trip to California last year, which were nice and sweet.  But after suffering the natural effects of being frozen, I knew I'd have to use them in a cooked format so I thought a crumble pie would work nicely.  

I used to make a cream cheese crust for tarts back when I was a pastry chef and since I had a block in the fridge, I decided it was meant to be.  Cream cheese crust is rich and tender with a nice flavor and if you haven't tried making one before I insist that you do so with the quickness.  It is SO easy to throw together and the extra fat makes for a dough that is difficult to ruin and easy to work with.  My one regret with this recipe is that I didn't blind bake the crust first, as I mistakenly thought the long cooking time and my stand-by trick of cooking pies on a pre-heated sheet pan would be enough.  Alas, it was not and the bottom of the crust was a touch soggy.  So for the recipe below I include instructions on blind baking the crust, to ensure you don't the same problem.  

If you hadn't already noticed, I'm a big fan of crumble toppings on pies.  Using one on top of the strawberry filling makes this tart essentially a berry crisp baked inside a cream cheese crust.  And since when is that ever a bad thing?  It's not, in case you weren't sure.  Try it out, you'll see.

Strawberry Crumble Tart with Cream Cheese Crust

Makes one 9-inch deep dish tart
Crust

Filling
2 lbs. strawberries, rinsed, hulled and quartered (I used half fresh and half frozen)
2 to 3 Tb. cornstarch, depending on the juiciness of your berries and if any are frozen (I use Instant Clearjel  by King Arthur Flour for thickening my fruit pies)
Sugar, depending on the sweetness of your berries - I used 1/2 a cup
Juice and zest of one lemon
1 vanilla bean, split and seeds scraped out

Crumble Topping
3/4 cup flour
3/4 cup brown sugar
1/2 cup sliced almonds
1/2 cup rolled oats
6 Tb. butter, melted

Pre-heat oven to 350 degrees.  Place a sheet tray on the rack in the bottom third of your oven and let it heat up along with the oven.

Roll out the dough and press into a 9-inch tart pan.  I used a ceramic deep-dish tart pan, commonly known as a quiche pan.  You could also use a removable bottom tart pan, but since they are about half as deep, you'll need at least a 10-inch pan. Line the crust with foil or a sheet of parchment and fill with dry beans or pie weights.  Be sure you have enough to cover the bottom of the dish evenly and to go all the way up the sides.  This is important so that your crust does not shrink.  Set the pan on the pre-heated pan in the oven and bake until set and firm, but not too brown, about 20 to 25 minutes.  Use the foil or parchment to lift out the beans and allow the crust to cool.

To make the crumble topping, combine the dry ingredients in a bowl.  Stir in the melted flour and mix until the ingredients are moistened and crumbly.  Put in the refrigerator to cool while making the filling.

To make the filling, dissolve the cornstarch in a few tablespoons of water.  In a small pot over medium heat, add the rest of the filling ingredients and dissolved cornstarch.   Heat the filling, stirring frequently, just until the juices simmer and thicken.  Spread the filling into pre-baked crust and then cover with the crumble topping.  Bake in the 350 degree oven until the filling bubbles and top is golden brown, about 50 to 60 minutes.  The filling will firm up and slice cleaner when the pie is cool.  It is delicious when warm but your slices may be a little messy if you care about that sort of thing.  Serve with ice cream to take it over the top.

The filling ingredients.  I happened to have a vanilla bean, but you could substitute extract or my new favorite product,  vanilla bean paste.

The crust fitted into the pan.  At this point I should have filled with with beans for blind baking.

Spread the filling into the crust, which you blind baked.
 
Topped and ready for the oven.

You'll get a cleaner slice like this if you let the filling cool.  Not that I know because I dug into mine too soon.


Thursday, May 9, 2013

Just Where The Hell Have You Been Young Lady?!

I know, I know, it's been a ridiculously long time.  No, longer than ridiculously long.  Whatever that is, it's been that long.  I've been here, I've even been baking and cooking.  I just haven't been blogging.  You know how it is when you ignore something (or someone) and you know you shouldn't be, but the more you ignore it the more you feel like you have to keep ignoring it because it just gets harder and harder to face it?  Well, that is me and the blog I guess.  And a ton of other things in life for like the past 10 to 20 years, for that matter.  But that is a whole different blog, I guess.

Let's see, when we last left off I was in the midst of a big transition in my life.  I was about to start a new job and feeling really positive about where I was going.  So that all got shot to hell.  The job, the transition, my planned re-invention, my positive outlook, my happiness and well-being, all of it blown to smithereens.  And so I once again made a big change in attempt to get back to the place where I wanted to be before.  I'm a very self-aware person.  One might say almost painfully self-aware.  I know what my demons are, I know why I do the shit that I do.  I endeavor to do better and be better but it is a slow process and I don't always move forward.  Sometimes I stand still for a long time and sometimes I take a step or two back.  But I'm not afraid to change.  If something in my life doesn't work I change it.  And then I'll change it again, and again, and again.  I still haven't found that balance I've been seeking, but I'll keep trying.  Lately I've realized that I keep changing situations and circumstances, but what really needs the most changing is me.  And that is the really, really hard part.  I'll keep trying.

So, what the hell does all this inner-reflection nonsense have to do with pie, you ask?  Nothing.  I was just rambling.  Anyway, I have been making pies in the last year, just not posting them.  So I've put some photos below to show you what I've been up to.  Not all of them have recipes yet, but I'll get there someday.  I'll keep trying.

I sold pies during Thanksgiving and Christmas to make a little extra cash. These two are sweet potato with Italian meringue, one my my most favorites. Get the recipe here.
Salted caramel apple, one of the most popular pies that I sold this holiday season. Get the recipe here and prepare for your friends to swoon.
This is a turtle pie.  Turtle as in caramel, pecans and chocolate.  Not the slow reptile with a shell. This was a special request pie I made for a good friend.  Her world was rocked.
This is a pavlova topped with fresh whipped cream, lemon curd and strawberries.  I made it when my dear friend Chef Mindy came to town for a visit.  Pavlova is probably in my top three favorite desserts.   It's kind of like a pie but instead of crust you make a delicious baked meringue that is all gooey and marshmallow-like on the inside.  Sweet, sweet heaven.
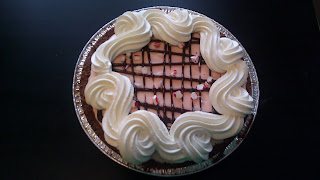
Chocolate peppermint mousse pie that I sold at Christmas. 
Bananas foster cream pies that I sold for Mardi Gras. Vanilla pastry cream, rum caramel, fresh bananas, oh my!!