Showing posts with label King Arthur Flour. Show all posts

Wednesday, July 20, 2011

Blueberry grudges

Let me start by saying that as a general rule, I think that whipped cream improves everything.   OK, maybe not sushi, but you know what I mean.  I kind of have a grudge against blueberries.  When I was running my business I spent countless hours baking delicious muffins but all anyone ever wanted was blueberry.  White chocolate strawberry?? No, thanks!  Apple streusel??  Meh.  I swear, I could have offered solid gold muffins for $2 but people would have still turned up their nose and asked, "Don't you have any blueberry?"  So I became bitter towards the blueberries, whom I wasn't all that crazy about to start with.  Now that I've had some distance from  my blueberry muffin days, I look at the little berry fondly again, and without giving them the stink-eye.  While they are still my least favorite of the berries, I think blueberries, like mostly anything, are vastly improved with whipped cream.  And ice cream.  So here is a blueberry pie topped with whipped cream.  Blueberries are very good for you, so it's OK to splurge on the cream.  Because life is all about balance.  And letting go of grudges.

Blueberry Pie (with Whipped Cream)

1 9-inch graham cracker crust

2 pints blueberries (mine were frozen)
juice and zest of one lemon
sugar to taste, I used 1/2 cup
4 Tb. instant Clearjel (or about 2 Tb. cornstarch)
1/2 cup water

2 cups heavy whipping cream
3 Tb. powdered sugar
1/2 tsp. vanilla extract

If you are using instant Clearjel, combine it with the sugar first, and then add to all the other ingredients in a small sauce pot.  Bring the mixture to a boil over medium-high heat, and then reduce to low and  simmer for about 10 minutes, stirring often.  Pour the filling into the graham cracker crust, smooth the top and put into the refrigerator for a few hours, until cold.

Whip the cream with the sugar and vanilla until stiff peaks are formed.  Cover the pie with the whipped cream, or use a piping bag and star tip if you want to make it fancy.  Enjoy!


Nothing like a thick ring of whipped cream to making everything better!

Tuesday, July 19, 2011

Life is a Bowl of Cherries!

It just wouldn't be a pie blog without a classic cherry pie!  I've actually never made a cherry pie from scratch.  When I was a kid I made cherry pie using canned filling.  But this was my first attempt using fresh cherries.  And by the way, get yourself a cherry pitter of some sort!  I still don't have one and did this by cutting the cherries open and prying out the pits and it took WAY too long, not to mention my cuticles and nails were stained for two days!  I'll be purchasing one today as I still have about five pounds of cherries to pit.

We've discussed before about the benefits of experimenting in the kitchen because you always learn something.  This time I learned that I prefer a juicier cherry pie and should put less thickener in the filling.  This one sliced nice and clean, but a little extra sauciness surrounding the cherries would have been perfection.  As with mostly everything, you'll need to adjust this filling to your taste and fruit.  Add a little extra sugar if your cherries are pretty tart, or don't, if you like them that way.

A lattice top crust is typically the way that cherry pie is presented.  Making a lattice from scratch is a commitment, so I thought this would be the perfect time to use my pie topper stencil from King Arthur Flour.  I used the heart side, of course!  For this pie I used my good ol' vodka pie crust from Cook's Illustrated and I highly recommend you do as well!  But nobody will know if you use a pre-made crust or your own favorite recipe.

Classic Cherry Pie
Makes one 9-inch pie

1 recipe pie dough for a double-crust pie
4 cups pitted cherries
Sugar as needed, I used 1/2 a cup
2 Tb. lemon juice
1/4 cup orange juice
2 Tb. cornstarch (may need more or less depending on your fruit)
1 tsp. vanilla extract
1/4 tsp. almond extract

Place a sheet pan on the bottom rack of your oven and pre-heat the oven to 400 degrees.  Combine all the filling ingredients and set aside.

Roll out your bottom crust and place into the pie pan, being sure to press it in evenly.  Roll out your top crust.  You can cut it into strips for a lattice if you like, or use a stencil like I did.  Place the filling into the the pie pan and brush the edges of the pie dough with water.  Cover with the top crust and press the edges together, the water will help them stick.  Trim the edges of the crust so they are even with the pan.   Flute them if you want, or just use the tines of a fork to crimp them.  If you aren't using any kind of design on the top, cut a few steam vents.  Place the pie in the freezer for 15 minutes then remove.  If you want, you can brush the pie crust with cream and sprinkle with raw sugar for a nice brown, crunchy finish.  Place the pie on the hot pan in the oven and bake for 25 minutes.  This will help the bottom crust set.  Move the pie and the pan to the middle rack and lower the temperature to 350 degrees.  Cook for an additional 20 to 40 minutes, or until the crust is nicely browned and you can see the cherry filling bubbling.
My adorable heart stencil!
By rolling your crust onto your rolling pin, you can easily transfer it to the pie pan.
My beautiful cherry pie after a short nap in the freezer.  Brushed with cream and sprinkled with raw sugar.  Look at those beautiful flutes on the edge!  Too bad they don't stay so perfect after being in the oven.
The finished pie!  See what I mean about the fluting on the crust?  Oh well, I'll work on it.

Peek-a-boo hearts! I see you cherries!

Friday, July 1, 2011

G'day, Aussie Meat Pies!

I've been hearing more and more about Australian meat pies in recent times.  From what I gather, they have quite a following in the U.S., and meat pie shops are popping up across the country.  I've never had one before, but I figure what's not to like about beef and gravy in a pie?  I love all pies, sweet and savory, so I knew I had to make some Aussie pies for the blog.

I did a lot of internet research on Aussie pies.   The basic idea is always the same, but recipes varied when it came to the crust.  Many called for a basic pie crust, some called for puff pastry.  A few recipes, including some from actual Australians, called for using a regular pie crust on the bottom and puff pastry on the top.  I decided to go with a regular "short crust" pie pastry, as that seemed to be most authentic.   However, I strayed slightly by using a rich short crust recipe, which adds eggs to the dough.  This would give the pie crust a little more structure, in addition to a nice texture and richness from the eggs.  I used my own variation of the crust recipe from Giada De Laurentiis' (the big-boobed, bobble-headed, over-enunciating host on Food Network) Pizza Rustica, which I had made in the past and knew that I like the taste of the crust, as well as its ease of preparation.  However, after making the Cook's Illustrated pie crust with vodka with such outstanding results, I knew I had to get some vodka  in there!  I also changed the recipe from part butter and part shortening, to ALL shortening, because I really do believe it makes a superior crust because Crisco doesn't contain water like butter does.  It also doesn't have as much flavor as butter, which is why so many recipes use all or part butter, but I figure when the filling is flavorful and beefy, who cares.

To bake the pies I used my newly purchased mini pie pans, available from King Arthur Flour. These are 6-inch pans and make pretty big meat pies.  Possibly a little too big, depending on your appetite.  If you don't have mini pans, you can bake one big pie and cut it into slices.   Or you can cut circles, put the filling in the middle and fold them into half-moon shapes, but be sure to seal the edges shut with water and press together with the tines of a fork.

Australian Meat Pies
Makes two, 6" pies

Pastry Crust
This recipe makes enough for a double recipe of filling (4 pies total), possibly with enough left over for a few small half-moon shaped pies.  Because I always like to plan ahead and make life easier for myself, I made the full recipe then divided the dough in half (to make 2 pies) and put part in the freezer for another use.

3 1/2 cups all-purpose flour
1 Tb. sugar
1 tsp. salt
1 cup shortening, frozen and then cut into small pieces
3 eggs, beaten
1 Tb. ice cold vodka
3 to 4 Tb. ice cold water

Blend the flour, sugar, salt and shortening in a food processor until the mixture looks like a coarse meal.  Add the eggs and blend briefly.  With the machine running, add the vodka and water (start with 2 Tb. water) and mix until the dough just starts to come together, adding more water a tablespoon at a time as needed.  Empty the dough out onto a lightly floured surface and divide into two pieces.  Flatten them out and wrap with plastic wrap.  I put one disc into the freezer for later, and the other into the refrigerator to rest for at least 30 minutes, or overnight if you like.  Because I used all shortening in this recipe, the dough does not get rock-solid and is very easy to roll out straight from the refrigerator.

Filling
1 lb.  ground beef
1 small onion, minced
3 Tb. flour
1 tsp. dried thyme
1 tsp. dried oregano
1 tsp. garlic salt
pinch of ground nutmeg
2 Tb. ketchup
2 Tb. soy sauce
2 Tb. worcestershire sauce
1 cup water
salt and pepper to taste
Milk, about a tablespoon for brushing the top crust

Put the ground beef and onions into a saute pan over medium-high heat.   Break apart with a wooden spoon and cook until the meat is no longer pink.  If there is a lot of excess fat, drain off all but about 2 tablespoons.   Add the flour, thyme, oregano, garlic salt, nutmeg and ketchup, still until well combined and cook for about 2 mintues.  Add the water, soy sauce and worcestershire, stir well and reduce the heat to medium.  Cook for about 10 minutes, until the gravy is reduced and the mixture is very thick.  Season with salt and pepper to taste.  Set aside to cool to room temperature.

Pre-heat the oven to 400 degrees and place a sheet pan on the rack, which should be positioned  at the bottom of the oven.  Heating the pan will help the bottom of the crust to cook properly.

Meanwhile, on a lightly floured surface, roll out your disc of dough to about 1/4 of an inch thick, 15-inch circle.  Invert the mini pie pans onto the dough and cut out two circles following the rim of the pans, these will be your pie tops.  Then cut out two circles about 1/2 an inch larger than the pans, these will be your pie bottoms.  (You can re-roll the scraps if you need to, but only do this once or the crust will be tough.)  Press the larger circles into the greased pie pans and divide the cooled filling between the two.  Brush water around the edge of the dough and top with the smaller circles, pressing well to seal.  Use a fork to crimp the edges.  Cut a few steam vents in the top with a sharp knife and brush with milk.  Place the pies on the pre-heated pan and cook for 25 minutes.  Move the entire pan of pies up to the top rack, and cook about another 10 minutes, to help brown the crust.  The pies should be brown and the gravy will be bubbling through the vents and looking quite delicious!  Allow to cool 10 to 15 minutes before digging in, or else you might burn your tongue!  The Australians say that serving these with ketchup is a must, but I'll leave that up to you.

These tasty pies are a perfect stand-alone lunch, or add a salad to make a complete dinner.  Experiment using different fillings if you don't want just beef, chicken and/or vegetables would be delicious too.  And if you really want to save yourself some time, I won't judge you for buying pre-made crust.  Just make them, you'll see what all the fuss is about!

Saute the beef and onions.
Add flour, ketchup, thyme, oregano and nutmeg.  Cook for a few minutes then add the water, soy sauce and worcestershire.
Cook for about 10 minutes until thick.  When you scrape your wooden spoon across the pan, the trail should stay separated like this.
Roll out half of the dough on a floured surface.
Use the pie pan to cut out the two different sized circles.
I re-rolled the scraps to get my last pie bottom.
Press the large circles in to the pans and divide the filling between the two.  Brush the edges with water and add the tops, sealing well.
Place the pies on the pre-heated sheet pan set on the bottom rack of the oven.  Don't skip this step, it makes the bottom crust nice and brown and crisp.
The finished pies!
Get in my belly!
Delicious pie with meaty filling and flaky crust.  You know you want it!
After eating 2/3 of a pie to myself and being thoroughly stuffed, I decided that smaller pie pans are needed for individual servings, or split one pie between two people.  Or just make the half-moon shapes as I described above.  I'll be doing that next time.  And there will be a next time very soon because these really can't be beat!

Wednesday, June 29, 2011

I'm crazy.

Even though I spent all day cooking in a hot kitchen, and even though it was 95+ degrees outside, I thought it would be fun to make an impromptu tart for the blog.  I have to post more often if I want to increase my traffic, so why the hell not?  Oh, and I thought of this fantastic idea at 8:00 at night, after I had already made a beer can chicken and salad for dinner.  So yes, I'm crazy.

But about that tart.  This is my version of a crostata (rustic Italian free form tart) or a galette, the French version.  The difference being that I use my favorite crust for tarts, pate sucree, or sweet dough.  Crostatas and galettes typically employ pate brisee, a short dough.  Pate sucree has a crisp, cookie-like texture that I love.  It is typically used in tarts that are first blind baked and then filled with goodies such as lemon curd, pastry cream, chocolate ganache and fruit.  But I like to mix things up, so go ahead and throw that fresh fruit in there and pop it in the oven.

For the fruit I used sliced strawberries, peaches and a handful of blueberries.  Use whatever fruit looks best to you and I highly recommend combinations.  Raspberries and peaches would be lovely.  The amount of sugar and thickener you use will depend on the sweetness and juiciness of your fruit.  I used King Arthur Flour's instant Clearjel, but you can substitute with about half the amount of cornstarch.

This is a tasty, beautifully unfussy dessert that doesn't require too much time.  The cookie-ish crust really stands up well to the cooked fruit, and finished with a little whipped cream, this is the perfect ending to a casual summer dinner.

Sweet Pastry Crust recipe available here on The Joy of Baking website.

Crostata My Way

1 recipe sweet dough
1 lb. sliced strawberries
2 small peaches, peeled  and sliced.
1 cup blueberries
5 Tb.  sugar
4 Tb.  instant Clearjel (or cornstarch, about half)
2 Tb. heavy cream
1 Tb. raw sugar

Preheat the oven to 400 degrees.

Prepare the sweet dough and chill as directed.  While the dough is chilling, combine the fruit and half the sugar in a bowl and let sit for about 20 minutes to bring out the juices.  Combine the remaining sugar and the Clearjel or cornstarch and set aside.

After the dough has chilled, roll it out into about a 10-inch circle and transfer to a baking sheet.  I prefer to do this using parchment paper.  Sprinkle the sugar/thickener mixture over the fruit and toss well.  Pile the fruit up in the center of the dough circle,  leaving a few inches of border. Fold over the excess dough, partially covering the filling.  Press any cracks together and patch up any holes that may have occurred during the folding process.   This is a very forgiving dough, you can mold it and press it as  needed.  Brush the edges of the dough with heavy cream and sprinkle with raw sugar to add a nice crunch.  Place the sheet pan on the bottom rack of your oven (to help the dough set) for 25 minutes.  Lower the heat to 350 and bake an additional 15 to 25 minutes, until the filling is bubbly and the crust is lightly browned.

Combine the fruit and half of the sugar in a bowl.

The beautiful fruit piled onto the dough.

Fold the dough around the fruit.

Brush the dough with heavy cream and sprinkle with raw sugar.

The baked crostata.  Don't worry about those lovely juices leaking out.

A delicious slice for me!

Sweet, crisp dough filled with juicy summer fruit.

I think this tart is best served slightly warm or at room temperature.  If you are weird and have leftovers you can refrigerate them, but don't let them linger too long as the crust will get soggy.

Saturday, June 25, 2011

Pie Confessions

I have a confession to make.  Actually, I have two confessions.  The first is that I've always struggled with making pie crust from scratch.  In fact, it wasn't until the last 6 to 8 years that I even really tried to work on my pie crust skills.  And even still, those damn Pillsbury pre-made pie crusts are just so convenient.  Just unroll the dough into your pie pan and have a nice day!  But for this pie I decided to go for it.  It's hot in my apartment today and pie crust doesn't like heat while it is being made.  Yeah, you get my drift.

My second confession is that the pie I made today is based on my fond childhood memories of eating sour cream blueberry pie at Marie Callender's.  I grew up in a very small town.  When Marie Callender's came to the "big city" an hour south of my home, my family went there for dinner and I tried the sour cream blueberry pie.  Wow, was my mind blown!  A sweet, juicy blueberry filling topped with  a creamy concoction of sour cream! What more could a chubby young girl possibly want with her fruit?  So that became my go-to pie whenever our parents agreed to take my sister and I to the culinary mecca that was Marie Callender's.

Times have changed and I cook for a living now, and it ain't at Marie Callender's!  My tastes my have grown up along with the rest of me, but I still think about that blueberry pie.  I've even thought about re-creating it in the past, but like many things on my eternal to-do list, I never got around to it.  Until today.  I've researched copy cat recipes for the Marie Callender's pie of my youth and I decided to use them as a foundation, combined with my own current tastes and delicious memories.  I knew that I wanted to use fresh blueberries, as opposed to the canned filling combined with minced apples that most recipes call for.  Luckily for me, there was a one-day sale on organic blueberries at work this week.  Um, I bought 12 pints.  It was such a good deal, I couldn't resist.  And you can freeze blueberries you know!  Oh, I don't have to explain myself to anybody, so there!  Where was I?  Oh yes, the filling.  I wanted a fresh filling that would set and slice nicely without being overly rubbery.  And the topping needed to be creamy and rich, with that lovely tart taste of sour cream.  This was to be the kind of pie that is made in separate components and put together, not like other sour cream pie recipes that call for baking fresh fruit in a sour cream filling thickened with flour.

Back to the pie crust.  I used Cook's Illustrated Foolproof Pie Dough recipe.  It really does make a great crust and the addition of vodka keeps it nice and tender.  Just keep in mind when rolling your dough, if it is hot in your house you may need to put your dough back in the refrigerator, a lot.  And you might need to patch it up in areas where the heat of your fingers causes it to start melting.  But seriously, don't let me scare you.  You really should try this pie crust recipe, it's by far the best I've had.  Even if mine didn't look as pretty, the taste and texture was out of this world.

You can find the pie dough recipe here, but I included some photos of the steps.  I used the recipe for a double crust pie and froze the other half because I knew I'd be using it again.  I recommend you do the same because if you're committing the time to making a crust from scratch, you might as well make it worth your while.  The filling of this pie will really depend on your sweetness and juiciness of your berries.  You'll need to taste the filling as you go and add more sugar, lemon juice and thickener as needed.

This pie turned out to be even better than I remembered!  I bet you'll enjoy it just as much!

Elisa's Sour Cream Blueberry Pie
I used a 9" pie pan

FILLING
2 pints fresh blueberries
sugar to taste, I used one cup
fresh lemon juice to taste, I used one lemon
King Arthur Flour Instant ClearJel Powder, I used 5 Tb.
water as needed, I used 3/4 cup

TOPPING
4 oz. cream cheese
1 cup sour cream
1/2 cup powdered sugar
2 tsp. gelatin, bloomed in 2 Tb. cool water
1 tsp. vanilla extract

Put 1 1/2 cups of the flour, sugar, salt, butter and shortening into a food processor bowl.

Pulse a few times until it looks like this.  Then add the rest of the flour and pulse again.

When it looks like this, dump the mixture into a bowl.

Add 1/4 cup vodka, yes vodka, and 1/4 cup cold water to the crumb mixture.  You may want to take a shot of vodka for yourself at this point as well.  To calm your nerves.

Fold and press everything together until it looks like this.

Divide the pie dough into two even balls and flatten them out.  Wrap both in plastic wrap.  I put one straight into the freezer for later and the other I put into the refrigerator to rest and chill for 45 minutes.

Roll out the dough and put into a 9" pie pan and do what you like with the edges.  I fluted mine and then put the whole thing into the freezer for about 30 minutes.

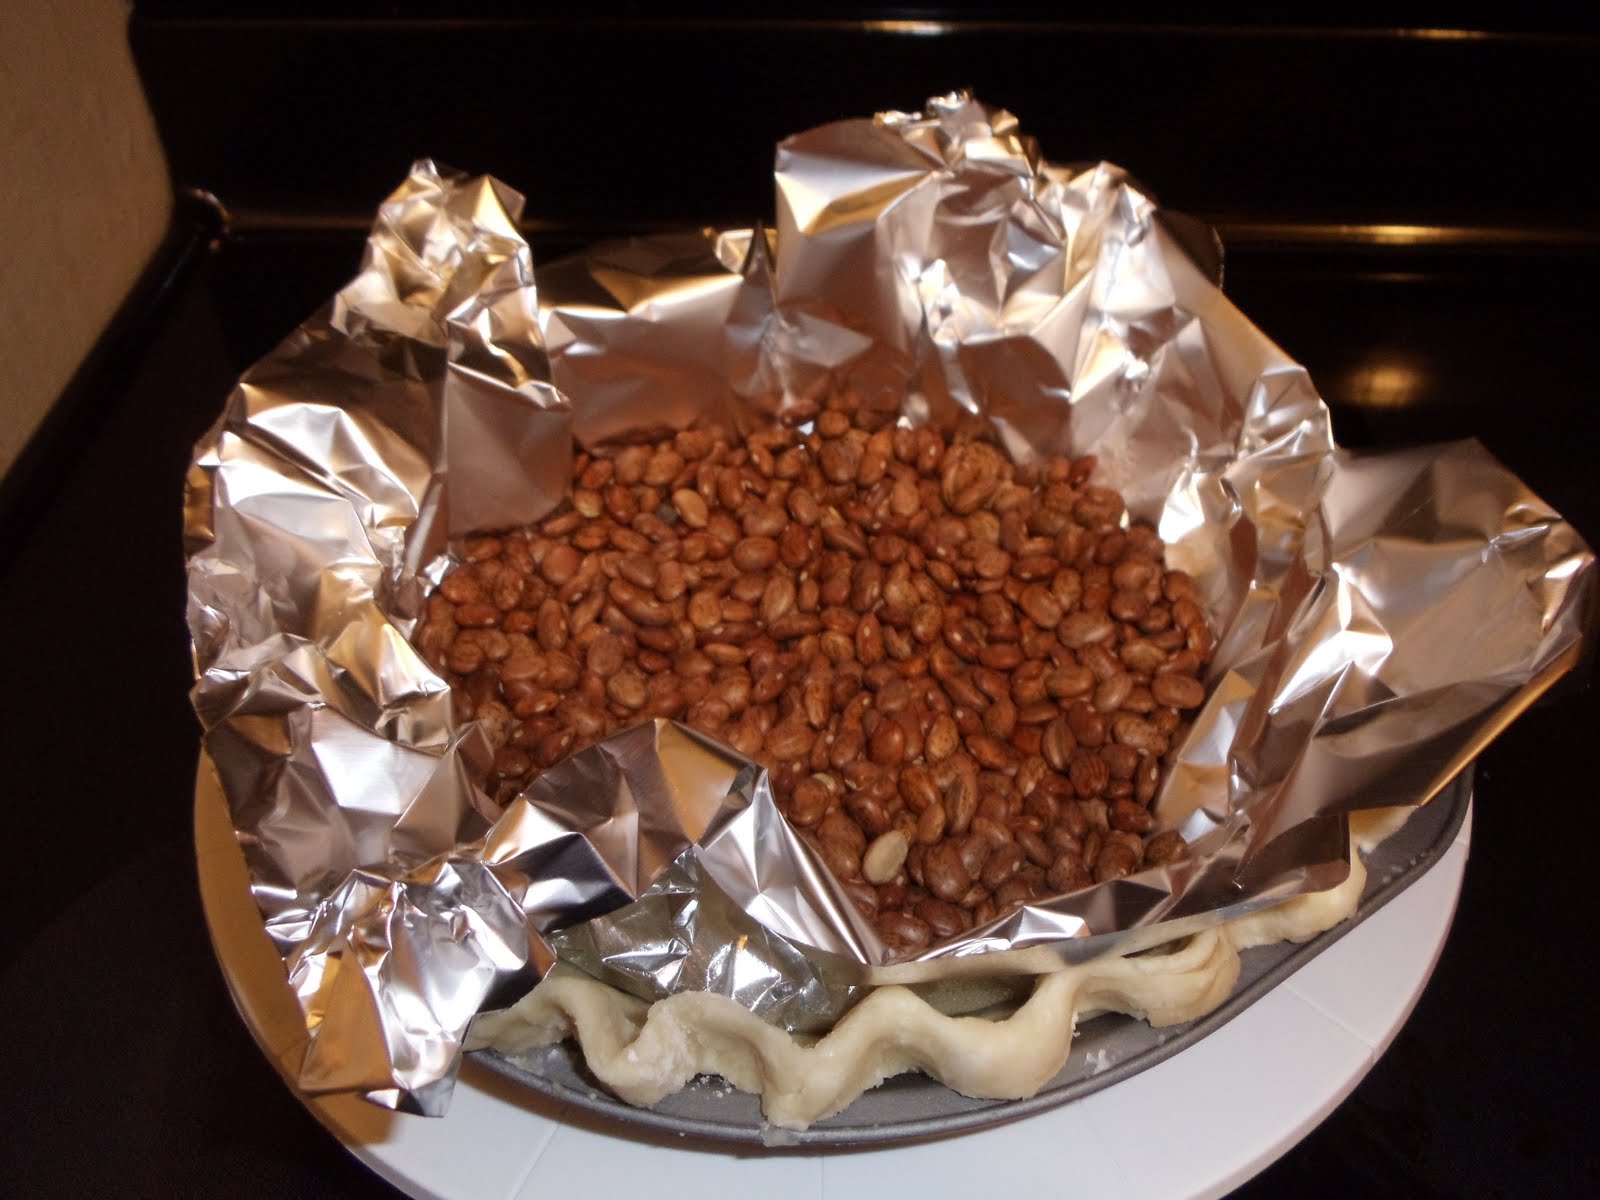
When the crust is nice and firm, line it with foil and fill with beans (or pie weights) to "blind bake."  This keeps the crust from shrinking too much and bubbling up.  Bake at 375 degrees for about 25 to 30 minutes.  Carefully remove the foil and beans and bake an additional 10 to 12 minutes, until browned.  Set aside to cool completely.

Meanwhile, mix the sugar and Clearjel thickener together and add to a  saucepan with 1 pint of blueberries, water, sugar and lemon juice.   Cook over medium heat, stirring often, until nice and thick and jam-like, about 15 to 20 minutes.  Taste your filling and adjust the sugar and lemon juice as needed.

Add the remaining 1 pint of blueberries and only cook for about 5 minutes more.  This will give your filling a nice fresh flavor with plenty of juicy berries bursting in each bite.  Scrape into a bowl and set aside to cool.  It doesn't have to be cold, but don't put it into your crust piping hot.

For the topping, combine the cream cheese and powdered sugar in a mixer bowl and beat until well combined and smooth.

Scrape the bowl often and then beat in the sour cream and vanilla.  Mix until smooth.

Melt the bloomed gelatin in the microwave, be careful this only takes 15 to 20 seconds.  Then slowly pour it into the mixer while it is running on low speed.  Increase speed to medium high and mix until everything is combined.

Pour the sour cream topping over the cooled filling in the pie crust. Put in the refrigerator for a minimum of 4 hours.

You can decorate the top with blueberries if you like.  Wow, look at the "homey touches" on that pie crust!  Don't worry, even if it looks a little rough, I promise it will be delicious!!

Close up of the delicious pie filling!

Delicious flaky layers in the pie crust!  This is due to the use of cold butter, shortening and vodka!

Monday, May 30, 2011

Stuff for getting my pie on.

I adore the King Arthur Flour baker's catalog.  When it arrives I greedily snatch it up and escape to my happy place, stocked full with specialty ingredients, tools of the trade and delicious looking baking mixes.  My sister shares my love of  KAF and for my birthday she bought me a gift card for the on-line store.  Believe it or not, it took me months to decide what I wanted to buy because I want everything!  When I started the blog, it just made sense to get something for making pies.  So here are my fun purchases that I will put to good use on the blog.

The box arrives!!

The other side has hearts.  Buy it here.

Ranked the top pie filling thickener by Cook's Illustrated.  Available here.

Adorable mini pie pans. I'll be using these for meat pies!